Here at Anything But Cute we love to see all the seasoned and expert mixed media artists, but we also want to encourage those who are just getting their feet wet. Our design team will always be on the lookout for these exceptional artists, and you just never know when we might be giving out something special to a talented mixed media newcomer.
Make sure to put 'newbie' after your name in the linky so we know who you are.
(new refers to 'new to mixed media' NOT 'new to our challenge')
----------------------------------------------------------------------------------------------------------------------------------------------------------------

Saturday, December 12, 2015

WINNERS - Challenge #7 - It's Ornamental

Hello Everyone, Pamellia here,

I can't believe 2015 has come to a close, wow!! Thank you so much to everyone for all of your support and for all of the amazing art you enter into our challenges every month!! With the holidays just around the corner, I am giving my lovely ladies a break until the New Year, so we won't be having a Feature Artist Post this month or a Spotlight Post this month. Our current challenge "You've Got Happy Mail" will remain open until January 4th, and the Design Team will be back to visit all of your wonderful projects first thing in the New Year.

From the entire team, we wish everyone a 
VERY MERRY CHRISTMAS AND A HAPPY HAPPY NEW YEAR!!!

Take it away Cec!

Cec here to bring you the winners from our It's Ornamental challenge in November. As always, we had a lot of fantastic entries and when you see such wonderful eye candy it sure is difficult to choose just one winner.  However, I stuck with it and after much back and forth, I made my selection for winner and runner-up, so without further ado:

WINNER - #10 - Lisa F

I chose this entry because Lisa gave us not one but two wonderful ornaments that are chock full of mixed media loveliness and just scream Christmas.   I just love all the crackle, the poinsettias, ribbon and frosted greenery.  Even though they are both unique, they have elements that tie them together so they will look fabulous together on the tree.

Congratulations Lisa!  Pamellia will be in touch by email to send you a personalized winner's badge and to provide details about being our Guest Designer for the next challenge.

***
RUNNER - UP


#6 - Mona Pendelton

This ornament and all the others that Mona made in this collection are stunning.  I love the use of  vintage tart tins with the added sparkle and the dyed trees and coordinating ribbon.  The baubles added to the bottom of each ornament are also so vintage looking and a perfect additional embellishment.

***
We have a special award to give out this month to a very talented artist who wowed us with her incredible snowy 3D scenes. She entered three projects and every one of them was just as magical as the next!! Turning paper into a winter wonderland isn't easy, and making it so beautiful that we wish we could shrink ourselves down to a few inches tall just so we can live there...well, that's incredible!! KRISTIN, you have...

OUTSTANDING TECHNIQUE


Silje Kristin


If you haven't been to visit Kristin, I highly recommend you go and soak in some of the magical creations she puts together!!

***
Now let's have a look at our DT favourites:


Branka's Favourite - This 3D outstanding piece of art has stolen my heart! Fantastic detailed crafting gem with so many amazingly arranged elements! Absolutely brilliant design!

Anne's Favourite - It was an incredibly difficult job to select just one from all the gorgeous entries we had!  I am totally in love with Nicola's beautiful little Christmas house with all the vintage details and wonderful textures.  It is a beautiful piece of home décor.

Sara Emily's Favourite - I have never seen such an amazing collection of ornaments in one place! I wish I could have picked them all as my favorite!  But in the end, I chose Nicola's 3D Christmas wonderland!  Every inch of this amazing creation is so carefully thought out and executed!  I fell in love with her layered Christmas tree around the side!  Please pop over to her blog to see all the amazing details, as one photo just isn't enough!


Niki's Favourite - #36 IrinaR
This design captured my heart! I love the textures, the pop of color and the images. That wolf is gorgeous and oh so like my dear Nanook! All of these animals are integrated into this design flawlessly. The real kicker is when you see the full design and the reds! Swoon!


Pamellia's Favourites

There are so many things about this sleigh that I love, it's hard to narrow it down to a favourite!! I love the refurbishing of something that otherwise might end up in the bin. I love the colours, the white just pops and the red explodes against those rich grey tones! And wow, that texture is just incredible! Those little red pom poms and big glittery snowflakes are so festive...SQUEAL!! 

It is hard to resist this luscious wreath!! All the earthy tones and bits of real nature just drew me right in, and then I melted over those fuzzy white poinsettias and big burlap bows!! The only thing missing is some reindeer...NO, WAIT...it has that too! Just love it! It's worth noting that I was vry torn between this wreath and Liz's other entry, a stunning 3D treeline. You can find it HERE...totally worth checking out!


Samra's Favourite -Lisa #10
Gorgeous textures, airy look, festive and heartwarming!

***
Honourable Mentions

There were so many amazing Christmas ornaments and decorations this month, I just couldn't keep it to just four! 

4. Chrissy            18. Nicole Wright           26. Cathryn             27. Lydia x
      

28. Corinne R.             31. IrinaR                41. Sharon             44. Ink-A-Pink
      

***
We would like to take a minute to send out a warm welcome to a new mixed media artist on the scene. From the entire team at Anything But Cute...we welcome

Donna - Room in a Cupboard
Donna entered this gorgeous ornament, a wonderful mixed media piece!! Way to get messy with it Donna!! We hope to see much more of your gorgeous work in the future!

***
A huge congratulation everyone! Thank you so much to everyone who played along with us last month and don't forget to grab your badges! You earned them!!

Merry Christmas to all, from the 'Anything But Cute' Design Team!

Saturday, December 5, 2015

Challenge #8 - You've Got Happy Mail

Hello Everyone!

Niki here and I am your hostess this for this month's challenge here at Anything But Cute. Can you believe it is already December!?! Wowzers, how time flies when you are having fun! You all made such amazing ornaments and decorations for our last challenge, I bet your homes look so very festive and cheery! Huge thank you to everyone that was able to enter the challenge, and another thank you to everyone that had a gander at this blog! Cheers to that Holiday Spirit! Don't forget to check back with us on December 12th when Cec and the team announce the winners of the "It's Ornamental" challenge. Now on to this month's theme.

December is too cold for me where I live but Christmas is my favorite holiday! The lights, the atmosphere, the cozy fires, and the Happy Mail all make this time of year special. With that in mind I wanted to create a challenge for you lovelies to share some of that Happy Mail.

You've Got Happy Mail!

We all like Happy Mail right? That feeling of being spoiled rotten when you receive a handmade card from someone is better than being wrapped up in a soft blanket near a fire, sipping on a hot latte (although I would be sipping on a Pumpkin Spice Latte-loves it!) So, for this challenge I would love to see some mixed media Christmas cards, tags, ATC's or whatever papercrafts you are mailing to a friend. Make sure they are inspired by the Spirit of the Season! Happy Holidays and Merry Christmas!

***
Guest Designer - Lynn

Hello Everyone! Sara Emily here, and I'm so excited to introduce you to our Guest Designer for December!  She was the winner of my "31 Days of Halloween" challenge in October.  Please welcome Lynn Price of Experiments in Paper!!

Lynn is an outstanding artist! She has such a creative mind and is willing and eager to use her products in unique ways to expand her creative boundaries. I think you will  agree Lynn is a creative force to be reckoned with, and I am so proud of the project she put together for this challenge.  Feast your eyes on this magnificent Happy Mail card! What an incredible work of art this is!


Hi, Lynn here, and I am delighted to be a Guest Designer for Anything But Cute!! I absolutely love the design team here, and am honored that they asked me to play along with this month's challenge by Niki - "You've Got Happy Mail"!

I am a nurse practitioner living on the northeast coast of the US.  I stumbled into paper crafting from art quilting, and finally put my toe into blog land just over a year ago. I really love playing around with different media, and a challenge!  And making cards is for me a huge challenge, lol!  I am not a good correspondent by snail mail, and I have a hard time working "small" - but I had a lot of fun coming up with this card.

The desire for a snowy holiday, and a peaceful 2016 inspired my design - I hope you like it! This is a double gate-fold card, with a variety of die-cuts, inks, glitter, and gilding flakes, as well as a bit of paint.  You can see full step outs at my blog for all the techniques and the development of the card itself. This is a thank you card to my many blog land mentors - a full list is in the tutorial!


***
And now for some inspiration from the talented Anything But Cute design team!

I love non traditional colours for Christmas and blue and white are my all time favourites. I made this card for a special person in my life and used lots of crackle, texture paste and a hint of sparkle to create my 'Happy Mail' card.


I was inspired to create this layered tag card using some non traditional Christmas colors and that is why I used pink color. I cut tags out of canvas and used some Distress ink sprays as well as my Dylusions sprays, Tombow watercolor markers, stencils, Distress inks and some embellishments to achieve a vintage festive look.

The vintage image of Santa was the driving force behind this card.  I have used distress inks, spray inks, embossing powder, texture paste and paint to create my happy mail. Unfortunately because this is so thick I will have to be the postman and deliver it or I would have to rob a bank to pay for the postage.

I wanted to use some non traditional colors and this black/white/red color combo is my favorite! Its even how I designed my wedding, including the damask pattern. Cards are difficult for me (not sure why) so I tackled this design by pretending it wasn't a card at first and then adding the panel to a card base. My mind works in mysterious ways. Happy Holidays and Carpe Diem!

Recently we had our first snowfall of the year and I just found myself so inspired by the frosty whites and purple and blue tinted winter skies. I have used lots of Gesso, paints, inks and DecoArt snow to create my mixed media Christmas Happy Mail card.

I created a good old "Christmas Wreath On The Door" card for this challenge. Cards like this always make me feel so warm and cozy wanting to open the door and greet the family behind it. The door was made using very thick cardboard and the "stone" wall was made with egg carton. You can see the step by step if you visit my blog :)

I seem to be stuck in a snowstorm this season! I just love the snow, but here in the south, we usually have a warm summer day on Christmas! So I'll just have to dream of a white Christmas.  I used gesso, paint, texture paste, embossing powder in a non traditional way, ink and lots of glitter to make my mixed media card.

***

I love how diverse this team is and how different the designs are! Wowzers! So much talent with these lovely ladies! Please hop over to the team blogs to see more photos and get some details on how these projects were made. And don't forget to leave some bloggy love while you're there. We appreciate the feedback and love reading comments. 

I hope that we have inspired you to head to your craft room and get to spreading some Happy Mail! 

The winner will receive the honour of being our Guest Designer for an upcoming challenge!

Here at Anything But Cute we just love to see all the seasoned and expert mixed media artists, but we also want to encourage those who are just getting their feet wet. Our design team will always be on the lookout for these exceptional projects and artists. You just never know when we might be giving out something special to a lucky mixed media newcomer. We all have to start somewhere, right?

Challenge runs until January 4th - we can't wait to see what you come up with! Happy Crafting from the entire team and thanks for visiting Anything But Cute! Merry Christmas!


Thursday, November 26, 2015

Spotlight Artist - Niki - Stamp Storage

Hello all you wonderful crafty people! Niki here, I would like to show you a practical way to store some of your unmounted stamps. I know there are many websites, videos, and DIY's out there about stamp storage but wanted to share my inexpensive way of storing stamps. We want to make room for any Christmas art supplies you receive from Santa right? I hope you enjoy and may be share how you store your stamps as well. Lets begin!

Supplies Needed: Unmounted Stamps (of course!)
                           3 Ring Binder
                           Card Stock (any light colors will work)
                           Hole punch
                           Clear Trading Card Binder Pages (like how Baseball cards are stored)
                           Clear Sheet Protectors
                           Black Archival Ink


I started with a white 3 ring binder because I have numerous ones from college. The trading card binder pages were purchased at Staples on sale (I think it was $3.99).


I also had the sheet protectors on hand because of my college classes as well. These are not expensive to buy though if you don't have any on hand.


We all have Cardstock in our stash, so that should be an easy item. I used pale green for this binder. You can use black but then the stamps won't really show up unless you use white ink to stamp with.

Now to put it all together. I started with the Clear Trading Card pages for the single stamps I have. Just slip the stamps into the slot and you are done! Easy peasy! I leave the clear plastic covers on the stamps because a lot of them have the design of the stamp on one side. You also have the choice of using a piece of your cardstock to stamp the image onto and slip that into the sleeve as well so you have an easy visual of your stamps in their slots.


Now for the Clear Page Protectors. First, pick out what stamps you want for this "page" of your stamp storage book. I used BoBunny's butterfly stamps and Gates. Using your black Archival ink, stamp all of the images onto your cardstock piece. Make sure you stamp the images in the place that you want to keep them, so that your stamps line up with the stamped image when the page is turned (this is the green page that you see in the picture below).  

Hole punch your cardstock so that it fits into your binder. Now we use the page protector-I cut 2 sides of the page protector, leaving the side that has the holes intact. This allows you easy access to your stamps without having to dig to the bottom of the page protector and have to pull the stamp out. Attach the clear plastic backing from your stamps to the inside back page protector (I used a clear tape gun, you can see the white strips in the picture below.


Than attach the pre-stamped clear plastic backing to the inside front of the page protector.


When you close this page, you should have 3 parts-the front of the page protector, your stamps, and the back of the page protector. Then your cardstock page with the stamped images.


Now you have your first page done and your stamps are easy to get to, as well as being organized! Pat yourself on the back! You can categorize your stamps if you would like. I don't have a huge amount (yet), so I just kept the stamps together by the company.


Keep adding pages and watch your stamp collection get organized in a relatively short amount of time! I did this binder while watching TV. The part that took the longest was stamping the image onto the green cardstock.


This is the stamped image on the green cardstock. I did cut out the make/name of the stamp set and glued it to my cardstock. I did this because it will be easy for me to remember where the stamp came from in case I need a new one.


Now your binder is full and ready to go! This also makes it easy to take your stamps to crops, or a crafty get-together with your friends. Win, win right?


I hope you enjoyed this post and maybe learned something new. We all have our ways of storing art supplies so feel free to share how you store your stamps! Hugs and Carpe Diem! ~Niki

Remember to check out our current challenge, It's Ornamental, hosted by the lovely Cec! Now that your stamps are organized and easy to get to, you know what Holiday stamps you have. Happy Holidays!

Thursday, November 19, 2015

Feature Artist for It's Ornamental - Welcome Cathryn!

Hello Everyone!

Niki here and I am so excited to finally get the chance to introduce you to our Feature Artist for November. She was the winner of my "Mixed Media Makeover" challenge in September. Welcome Cathryn Wood of Strangely Creative!!

Cathryn is an amazing crafter. She is such an amazeballs and versatile crafter. She has also been known to teach some interesting techniques. Every time I visit her blog, I learn something new. She shares some of these techniques with this gorgeous design!

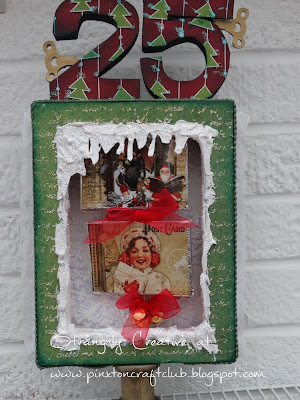
I think you will all agree that Cathryn is a creative force to be reckoned with and I am so proud of the project she put together for our current challenge "It's Ornamental"! Feast your eyes on this!! Not only did she design a gorgeous, vintage display box but she made 2! What! Shut the front door! Both are stupendous and make perfect displays for any house during the holidays! I can go on and on about these but you should know more about this lovely, and Strangely Creative lady!

***

I am thrilled to be chosen as Feature Artist for such a lovely challenge blog as Anything But Cute - I am Cathryn Wood, although I am known as Strangely Creative.


I have always loved art and crafts, and have had huge fun within the industry and along the way have made some lovely friends as well.   I have taught art all over the UK and Holland, designed various products, done TV work, and just had a great time! I am always laughing, and hope to keep it that way!

"It's Ornamental" is such an inspiring challenge - straight away I knew that I wanted to do something using a box canvas, and that would stand alone.  Also I wanted to use my faux microscope slide technique.


First of all I created the faux microscope slide by choosing an image (I collage a whole sheet of images at once). Laminated it, and for the back of the slide used some hardboard but you could cut an old book cover, grey board etc to size.

Next, I stuck some kitchen foil to some double sided tape, and attached this around the edges to look like soldering,  It is really effective!  There is a tutorial on my blog for this which I hope you will view.


So here is my "stuff" - my start point!   A canvas, a cotton spool for the base, 2 faux slides (I couldn't decide which one to use at this point), a frame cut from scrapbook paper, a crown I cut from foam-board and 2 bells.

First of all I die cut some snowflakes and glittered them up and then stuck them to the back of the canvas,


The next stage was to paint the back and sides of the canvas with a colour darker than the scrapbook paper (I used a deep Rookwood Red).   Then glued the scrapbook paper frame into place and drilled a small hole into the top of the frame.


I cut and shaped a length of card to look like hanging snow, and glued this to the top of the frame then used texture paste over the card, on the inside of the frame and around the edges and also glittered it whilst it was wet.

The foam board crown was covered with scrapbook paper and then the edges neatened using the faux soldering idea (as used on the faux slides).  Then I inked the edges of both frame and crown, the 25 comes from the Tim Holtz Salvage Stickers Lost and Found collection.   The key is from the TH Alterations movers and shapers die, and its actually 10 layers of card stuck together.

I gathered together various bits of lace, the large bundle in the front I dyed with tea for a really vintage feel.


I then decided I wanted the frame to stand proud from the cotton reel, so drilled another hole and glued some doweling into it.  The lace was glued onto the back of the canvas in layers so its really full, then I added some Stickles in Diamond for further interest. I sunk the key into the foam-board and then glued it into place.


The next step was to tie the bells onto some thread and stick the thread along the back of the slide, and up through the hole in the canvas where I glued it firmly down.   The slide moves slightly and looks really good.

Finally the crown was glued into place and I added some more Stickles along with a red bow and popped it into the cotton reel!


I enjoyed it so much I made a second one - exactly the same way but slightly larger and using cardboard numbers instead of the crown.


I hope you have enjoyed this project and feel inspired!

***

WOW, is about all I can muster! My vocabulary escapes me! From faux soldering, to faux microscope slides, these are brilliant and so very festive and not to mention stunning! Did you see that snow effect!?! Are you inspired because I know I sure am. Thank you Cathryn!

I hope that seeing Cathryn's wonderful creations will inspire you to join me for our current challenge "It's Ornamental"!

You have until the 4th of December to play - and you'll find all the challenge details as well as lots of inspiration from the brilliant Anything But Cute design team by clicking on the challenge link.

Happy Crafting and Carpe Diem
~Niki!