Here at Anything But Cute we love to see all the seasoned and expert mixed media artists, but we also want to encourage those who are just getting their feet wet. Our design team will always be on the lookout for these exceptional artists, and you just never know when we might be giving out something special to a talented mixed media newcomer.
Make sure to put 'newbie' after your name in the linky so we know who you are.
(new refers to 'new to mixed media' NOT 'new to our challenge')
----------------------------------------------------------------------------------------------------------------------------------------------------------------

Friday, October 30, 2015

Introducing Anne

Hello Everyone!

It is with great pleasure I am here today, as I am introducing the newest member to the Anything But Cute design team. I have been following Anne's work for some time now and not only have I been lucky enough to get to know her amazing work, but I have been even luckier to get to know what a wonderful woman she is! Please hang around and learn a little bit more about this spectacular artist and see some of her outstanding mixed media creations! I am so honoured and thrilled to welcome...


Hello Everyone! My name is Anne Redfern (or Redanne as I am known in Blogland). Since emigrating from Canada 40 years ago I have lived in the beautiful County of Cheshire in England.

I have always loved crafting, in any form, be it sewing, knitting or papercrafting.  I also share my DH's passion for model railways (we are planning to build one from scratch). About 6 years ago I took early retirement after a long and rewarding career in Human Resources. Since the family had long flown the nest, I was tempted, after seeing a demo in a Craft shop, to buy a Big Shot and a couple of dies and the rest, as they say, is history! My latest love is mixed media and although I have only fairly recently dipped my toes into this amazing form of art, I really am completely hooked!

***
Anne has picked out a few of her favourite mixed media projects to share with us today. Her creativity just blows me away and her ability to creature texture is absolutely incredible! Every project is unique and truly a work of art!

***

This is my most favourite project ever, ever! I just love building 3D projects and this one is constructed from two Artist Trading Blocks. I love how a few paints and mediums can create a true rusty and aged appearance on plain white card - it just fascinates me....

This little binder album was created using a faux wood technique, taught to me by my exceptionally talented friend Jenny (Buttons). Rust features quite heavily too both inside and out, something I think I have a slight obsession with! 

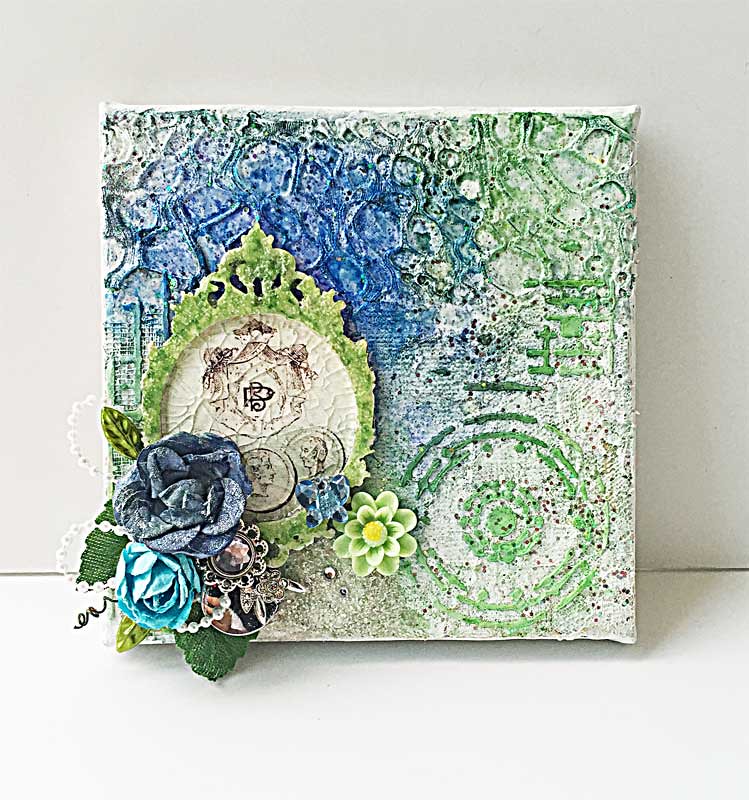
This 5" x 5" canvas was an absolute joy to make, I just love using pastes to create lots of texture.  I adore creating underwater scenes, they feature heavily in my work and this is one of my favourites.

I am truly inspired by the work of Andy Skinner and this Valentine block was made using his faux letterpress technique and lots of DecoArt products. It is perhaps a more 'pretty' result than Andy's style but I am happy with that. The flower is handmade, another passion of mine but one that has not been used much lately.

I absolutely adore Halloween and this was a project I did in an on-line class with Richele Christensen over a number of weeks.  It is chock full of wonderful techniques that I still use today.  This project really gave me the confidence to delve more into the wonderful world of mixed media.

***

Well, I think you will agree that Anne is a mixed media genius and I am just so excited to see what she comes up with for our challenges! She is going to be a wonderful source of knowledge and inspiration!!

Please come and visit us again on Thursday, November 5th when we start our next challenge, and don't forget to hit that Follow button while you're here!

Thanks for visiting and Happy Crafting!
Pamellia :)

Monday, October 26, 2015

Spotlight Artist - Branka - Dylusions Paints

Hello! It's Branka here and I am pleased to be presenting the spotlight post this month, which is about playing with Dylusions paints. You may already know how devoted I am to these awesome paints. After reading this post you'll find out why. Dylusions came out with a line of twelve paints designed to match their ink sprays.


Here is the list of colors: Black Marble, White Linen, Bubblegum Pink, Postbox Red, Squeezed Orange, Lemon Zest, Fresh Lime, Cut Grass, Vibrant Turquoise, London Blue, Crushed Grape and Melted Chocolate. They come in jars and they are very liquid so be careful when you open the jar. The paint cleans up easily with warm water and soap. I love to apply them using my fingers and my brush.


These vibrant paints are easily blendable and they are translucent which I love. Not too thin and not too tick, this paint is just perfect for art journaling and mixed media creations. If you want to achieve a less translucent look, you can apply more layers of the desired color. Since they are designed mostly for art journaling these are fast drying paints and they are permanent when dry so you have to bear that in mind when blending them. 

I used 'finger' technique to create the background on this card:


If you want to achieve more smooth look you can use your baby wipe to apply these paints and to blend them. I like to use Dylusions paints directly on my art journal pages or manila tags without gesso. These paints can be diluted with water as any other acrylic paint. It's a great way to create beautifully blended backgrounds using as many colors as you want and creating as many layers as you desire. 


Here's the example of an art journal page with baby wipe blended background:


The other way you can apply these paints is using the Tim Holtz mini blending tool. You can apply the paint randomly or you can use Dyan Reaveley's block technique like here:


Tip: in creating these blocks use the paint from the lid of your jar because in that way you can more control how much paint you take. I always take a very small amount of paint and testing it on my craft sheet to be sure that it's not too much. 

After creating your blocks you can play with your stencils. Small amount of paint, mini blending tool and your stencils - that's all you need to create a vibrant and wonderful background.


I like to add borders using my stencils and mini blending tool to achieve more finished look. 


You can doodle since this paint accepts all types of writing inks. One more fantastic thing - the pages won't stick together after you use Dylusions paints. Here's the example:


If you rather like to achieve a kind of effect for your background as on the picture below.


Then you can use your brayer and a palette knife. Pick a small amount of paint with your palette knife and place it on your craft sheet. Use your brayer on the paint and randomly roll on your paper or art journal page. Play with different color combinations and because of these fast drying paints you will be able to quickly add many layers. How fun is that?


This is how this technique works on a black surface:


Tip: You don't want to waste your paint so you can use your palette knife and draw or doodle on the rest of your paint after brayering and press a tag or an art journal page onto it. Cool, isn't it? To achieve the same result you can also use Dylusions paints with your gelli plate. The trick is to always use a very small amount of paint. You can always add more paint if you want to.


You want to create a Bokeh effect background like I did here?


Just clean your mini blending tools in your art journal. I always try to leave my blending tools as clean as possible after using them with Dylusions paints. To do that I am just creating dots in my art journal. To achieve a Bokeh effect you can use your mini blending tool with White Linen Dylusions paint and create white dots randomly over the dotted page.


I hope this post has inspired you to play with these awesome paints, to experiment with them in creating something new, fun and beautiful! 

There is still time to join the fun for Sara's 31 Days Of Halloween at Anything But Cute! 

You have until the 4th of November to play - and you'll find all the challenge details as well as lots of inspiration from the brilliant Anything But Cute design team by clicking on the challenge link.

Happy crafting!
Branka x

Monday, October 19, 2015

Hello Everyone!

Georgie here and I am so excited to finally get the chance to introduce you to our Feature Artist for October. Welcome IrinaR of Handmade by Irina Rakovets!!

Irina is an amazing crafter. She is a wowzers-style mixed media artist with such an eye for texture, layers and detail.

I think you will all agree that Irina is a creative force to be reckoned with and I am so proud of the project she put together for our current challenge "31 Days of Halloween"! Feast your eyes on this!! Her 3D back to front canvas is jaw dropping to say the least, so much texture, great use of layering and colours - don't you just love that speckled use of orange?!!. This has for me, Halloween down to a tee!

Here is a little more about Irina:
--------------------------------------

I am Irina Rakovets - many people know me under the name IrinaR (my blog Скрап-ХоббиМания). I live with my family in a picturesque corner of the Gulf of Finland, near St. Petersburg.

For about three years as a scrap came into my life and is not going to leave. We can not say that I am an adherent of any one style, although very much like Vintage, Shabby, but Steampunk attracts me, especially because lately I've been very fond of the paint, so often my work can not do without the mix-media. You could say that I was "scrap omnivorous": I like to make albums and notebooks, canvases, pages and greeting cards, and even my last love - tags.
I would be very happy if my work will inspire you.
Hello everybody!
This month I have the honor to be invited to the designer of a very interesting and creative Challenge Blog Аnything But Cute and inspire with CHALLENGE HOSTESS - Sara Emily in CHALLENGE THEME:


That's my job - altered canvas Art.


Now, a more or less detailed description of the process.
1. I used to make my canvas size 15х20sm, and as usual it backwards.
2. primed with acrylic primer on both sides.
3. Use the template (stars) and texture paste applied pattern. Glued the net (imitation cobweb)
4. Examples of suitable and pasted on chipbord (home of the pumpkin and cut herself from the beer carton)


5. All the meticulously painted with black acrylic primer.
6. It seemed to me that chipbord looks like something inexpressive, so for a more pronounced texture I added texture paste craquelure and texture paste with glass beads.


7. Then again, covered with black acrylic and add orange accents. The windows and the month after painting acrylic, flooded-glossy accent. I use acrylic paint "gold of the Incas", finger (I also do do not urge, I just so convenient) color the projecting parts of the canvas (composition).
8. glued the remaining chipbord and apply black acrylic orange accents.
A bat is glued to a piece of the overlay, and then the inside of the canvas.


9. And so finished canvas.

Inspiration to you.

I hope that seeing Irina's wonderful creation will inspire you to join me for our current challenge...
31 Days of Halloween!

You have until the 4th of November to play - and you'll find all the challenge details as well as lots of inspiration from the brilliant Anything But Cute design team by clicking on the challenge link.

Happy Crafting
Georgie!

Monday, October 12, 2015

WINNERS - Challenge #5 - Mixed Media Makeover

Niki here....Well hello there and thank you all so very much for your continued support here at Anything But Cute! Today is the day our winner of our Mixed Media Makeover Challenge is announced! First, I want to give a huge round of applause to each and every one of you lovely artists that shared your makeovers with us! Take a bow and give yourself a pat on the back because you have more than outdone yourselves! I loved looking at the Before pictures to see how you did your makeover. You are all awesome sauce!

After much debate in my head and a lot of talking to myself (it helps with the creative process!), I have chosen the winner:

WINNER: #7-Helen
This design caught my attention from the get-go and it got even better when I read the rest of Helen's blog post! Her before picture showcased a more muted color palette and a piece she wasn't happy with. From that to the end result is an amazing transformation! I love the way the heart is broken, and maybe on the mend, with the small criss-crossed wire and that corrugated heart is awesome sauce! Such wonderful texture on those three panels! Wowzers!

Congratulations Helen! Pamellia will be contacting you via email to send you your personalized winner's badge and details about being our Featured Artist for the next challenge!

***
And now for my Runner-Up


#20-Sheila 
What I loved most about Sheila's design is how many pieces she used to create this makeover! She used 5, yeppers, 5 different makeover designs to create this journal page! She embraced this challenge with such enthusiasm and gusto and it feels like she had a wonderful time doing so. Each piece was awesome by themselves and when she put all 5 together it turned out fantabulous!

***
Now on to our DT Favourites


Branka's Favourite#18 Deborah Wainwright

This beautiful creation cought my eye because I love that watercolor effect! The background is just fabulous and those Bistres are wonderful! Also, loving the colours and white highlights! Awesome transformation!


Cec's Favourite - #10 Sandra Crosfield
I chose this transformed canvas because it now has a colour palette that is more appealing (at least to me) than the original. I also love how it now has a lot more textural elements and things to look at while keeping the word Create as the focal point.


Pamellia's Favourite15. Strangely Creative
Cathryn really caught my eye with her fantasy piece. She has layered a mini canvas onto her large canvas creating a gorgeous 3D work of art. Her use of wax to create texture and interest is fabulous and her whimsical image made me smile. A wonderful transformation from the cutsie piece this started out as.


Samra's Favourite -#8 Ivonne Yam
Ivonne made this gorgeous canvas that is so very much mixed media, yet so very much leaning towards shabby chic, which is my favorite style of crafting. That antique frame, pretty roses and vintage images inside the frame stole my heart.


Sara Emily's Favourite# 32 Joi

I really wish I could pick more than one favorite, because I had many! But in the end, Joi's Leaf On Serenity Lane canvas won me over.  Admittedly, her rejected canvas started out on the wrong foot, but she took the lemon and made lemonade!  And what sweet lemonade it is!  Who wouldn't want to take a walk down her beautiful autumn path! What a joy that would be!

***
We would like to take a minute to send out a warm welcome to a new member of the blogging community. It's always great to see a new 'face' and we are tickled to have another talented mixed media artist to join the world of on-line crafting.

From the entire team at Anything But Cute...Welcome
THE DESI-CRAFTER

We hope to see much more of your gorgeous work in the future!

***
A huge congratulation everyone! Thank you so much to everyone who played along with us last month and don't forget to grab your badges! You earned them!!

There is still plenty of time to enter Sara Emily's current challenge 31 DAYS OF HALLOWEEN! We can't wait to see what you come up with this time!

Hugs to all, from the 'Anything But Cute' Design Team